Remote development, real infrastructure: How Tailscale let us test in the GIN network
How we test in the GIN network with Tailscale: secure remote access to protected medical infrastructure, without a classic VPN or port forwarding.
Modern software development often sits between two worlds: we build applications remotely, flexibly and with agile methods, yet we have to work with local, regulated infrastructure that is the exact opposite.
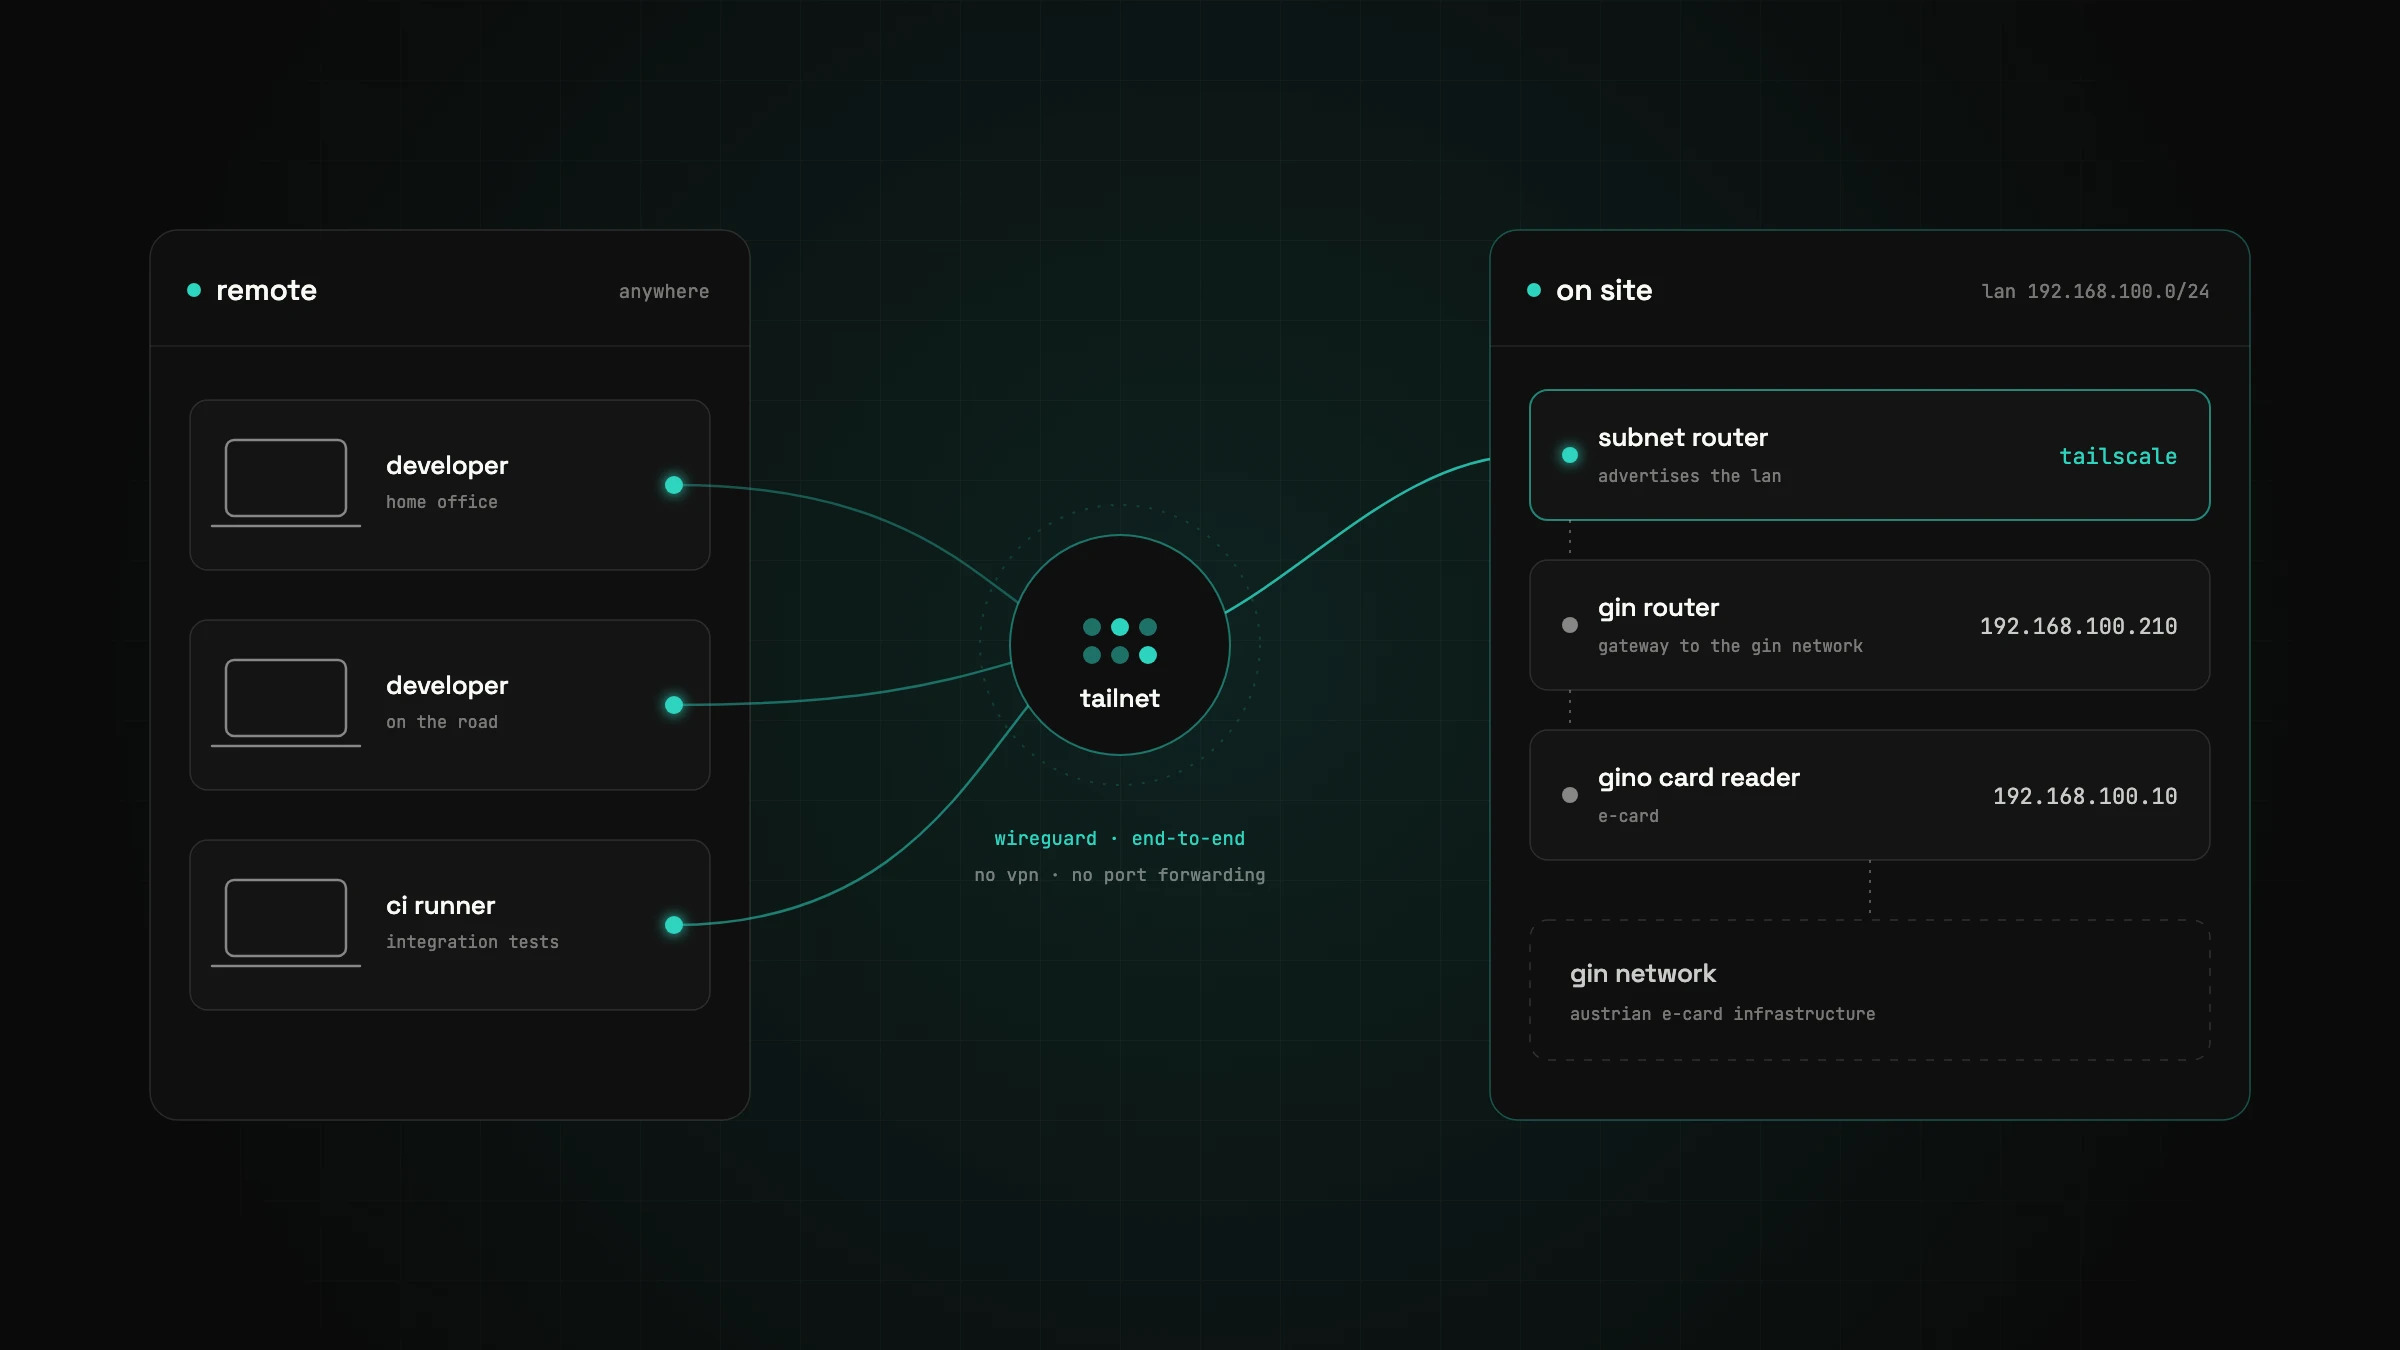
That is exactly where we found ourselves recently on a client project for medcom GmbH. The company runs software for ordering lab tests, for which we built an interface to the Austrian e-card infrastructure. Technically, this means the software has to query patient and insurance data through the Health Information Network (GIN, Gesundheitsinformationsnetz), a completely isolated network with its own hardware, IP range and strict access rules.
The setup was a classic local one:
-
LAN subnet
192.168.100.0/24 -
A GIN router with IP
192.168.100.210 -
A GINO card reader with IP
192.168.100.10 -
All physically installed at medcom's premises
And, importantly, every site of a contract partner, whether a doctor's practice, a laboratory or a software vendor, needs certified hardware physically on site for a direct connection to the GIN network.
For the application itself, integrating the e-card interface was not rocket science: there are OpenAPI and SOAP standards for it. The real challenge was testing. How do our developers test the integration when they are not on site and cannot access the e-card infrastructure directly?
No VPN? No problem.
A classic VPN? The obvious choice, but impractical: we have no access to medcom's network hardware to set up port forwarding, and any change means work for an external IT service provider. We needed a simple solution that didn't touch the infrastructure.
Our solution: Tailscale.
Tailscale uses the WireGuard protocol to set up a secure, lightweight peer-to-peer VPN between devices. No complicated setup, no port forwarding, no fiddling with certificates. We were able to connect two systems in completely different networks over the internet, as if they were on the same LAN. Tailscale is more than "just another VPN". It is a modern, secure mesh network:
-
Zero-config VPN – no port forwarding, no static IPs, no NAT problems
-
End-to-end encrypted via WireGuard
-
SSO integration – login via Google, Microsoft, GitHub, etc.
-
Automatic peer-to-peer connections – for better performance with lower latency and higher throughput
-
ACLs, tags and access control directly in the admin panel
-
No central VPN server required – every client can be a relay or exit node
-
GitOps & automation with Pulumi, Terraform, GitHub Actions, Bitbucket, etc.
-
Tailscale SSH – automated access control for SSH connections in the tailnet
-
Kubernetes Operator – Tailscale can also run in Kubernetes to manage access to private services
In our case:
-
We installed a Tailscale client on a Windows computer in the medcom network.
-
It became the relay node for the network (
192.168.100.0/24). -
The target route (
84.38.112.0/24- e-card test instance) was routed via GIN router192.168.100.210. -
Our developers could easily access the test instance of the e-card interface from home: securely, with good performance and in a traceable way.
Complex networks, simple solutions
In healthcare in particular, modern development practices often run into rigid infrastructure. Instead of turning processes upside down, we use tools that fit into existing structures, such as Tailscale. That way our developers can work efficiently without the customer having to rebuild their environment at great effort.
Setting up Tailscale in 3 steps
Goal: A developer needs remote access to an internal network (e.g. when working from home).
What you need
-
A computer in the target network (e.g. Windows, Linux, macOS).
-
One or more clients, e.g. the developers' laptops.
-
Administrator access to the devices.
-
A free Tailscale account.
Step 1: Install Tailscale on both sides
In the target network (relay node)
Install the Tailscale client:
curl -fsSL https://tailscale.com/install.sh | sh
sudo tailscale up --advertise-routes=192.168.100.0/24
Note:
--advertise-routesmakes IPs or entire IP ranges reachable in the tailnet without installing a Tailscale client on every host (e.g. on the GIN router192.168.100.210).
On the developer laptop
Install Tailscale here too, log in and start the service:
sudo tailscale upOr simply use the GUI on macOS/Windows.
Step 2: Approve devices in the Tailscale admin panel
https://login.tailscale.com/admin
-
Under Machines → [relay device], turn on “Enable exit node / subnet routing”
-
Explicitly approve route
192.168.100.0/24
Step 3: Test the connection
You can now test a connection to the internal IP 192.168.100.210 or 84.38.112.X, e.g. with ping or by opening the test instance of the e-card test interface directly in the browser.
ping 192.168.100.210Done!
Tailscale is now active, subnet routing works, and the team can work as if they were on site. No VPN gateways, no fiddling with OpenVPN or certificates, and the whole thing takes less than 15 minutes.
Further information
Got a similar project in mind?
In a free initial call we look at your situation and tell you what's realistic and what the next step looks like.

// about the author
Alexander J. Gassner, MSc
Founder and managing director of agsolutions, with more than 15 years in software development (MSc Software Engineering, FH Hagenberg). Builds and runs business-critical software from requirements to operations: Kotlin, Spring Boot and React in the code, Kubernetes, Pulumi and GitOps in operations, as an Exoscale Certified Solution Architect.